Welcome to iconStiX
an easy-to-use icon tool to combine & attach image as custom icon
Quick Start
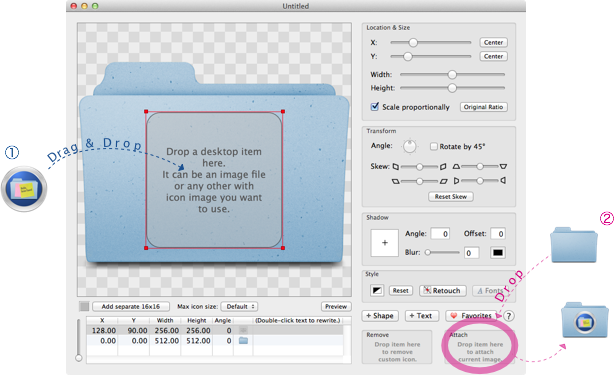
A standard document like the picture below opens when the program starts up for the first time.
1. Drag and drop any item from the desktrop to iconStiX and confirm to replace the placeholder.
2. Drag and drop a folder to the "Attach" drop box.
Combine & Attach
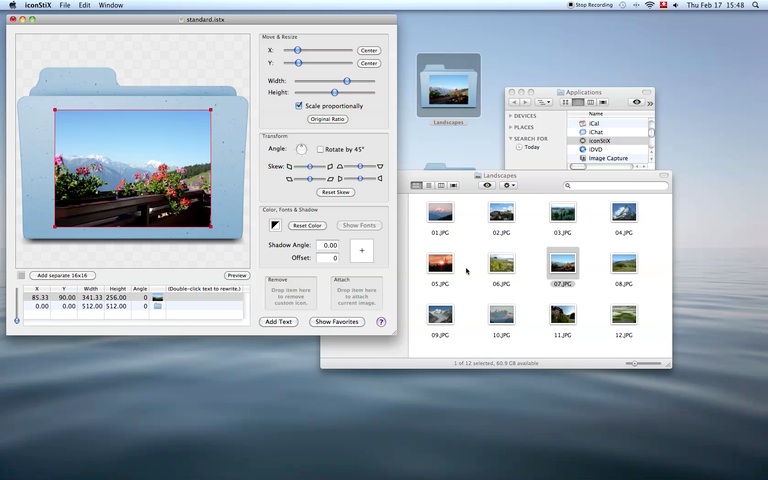
Image as Color (new in v.1.7)
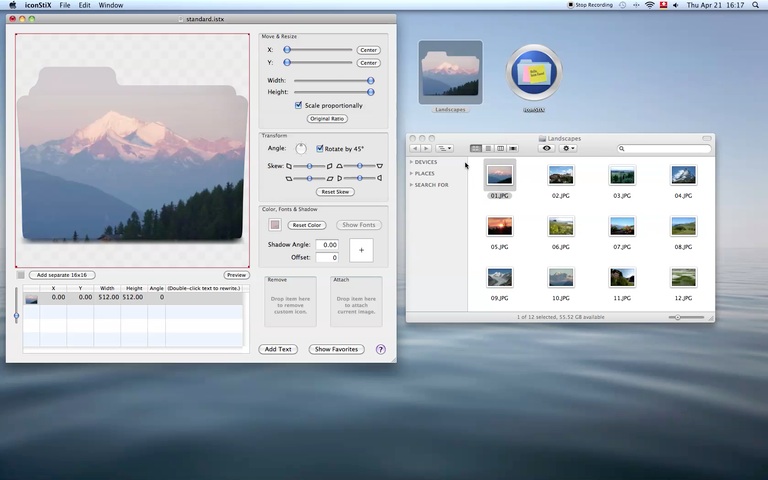
Photo in Shape (new in v.2.0)
Simple Effects (new in v.2.3)
<-- -->
-->
Main Features
Document
You can open a new empty or standard document (see the "File" menu).
Save (⌘S) a document to keep your modifications.
Use the menu "Export As" to save the preview in the icns, png or tiff format.
As to png, include a number in the file name to determine the size (e.g. img_128.png for 128x128 image).
Object Table
Objects (image and text) displayed in the preview are listed in the table below the preview.
The object listed at the bottom is drawn first; the one at the top, last.
The column and/or row order can be changed with drag & drop.
You can change the row order also with an up or down arrow key while the shift-key pressed down (without the shift-key selection is changed).
To change the row height, move the vertical slider next to the table.
To increase the table height, enlarge the window (drag the window's right-bottom corner).
Separate 16x16
Icons displayed in the smallest size of "16x16" may not be distinct enough if they are automatically scaled down from maximum 512x512. In such a case, you can use a separate image. Click the button "Add separate 16x16" and select a file whose image contents or whose icon image you want to use. Afterwards, you can replace images by dropping another file on the small area showing the 16x16 image. It is removable by clicking the same button.
Max icon size
As default icons are made of 16, 32, 128, 256 and 512 square image representations and 1024x1024 is added if such quality is available. However, you can limit the maximum size to 512 (i.e. no 1024), 256 or 128. Then, icons attached to items or saved as image consume less memory but may look blurry.
Preview
You can preview the icon image in different sizes (between 16 and 512) by click the "Preview" button.
In the preview mode click the "Animate" button to see the image resizing automatically or move the slider manually.
CLick "Edit" to go back to the edit mode.
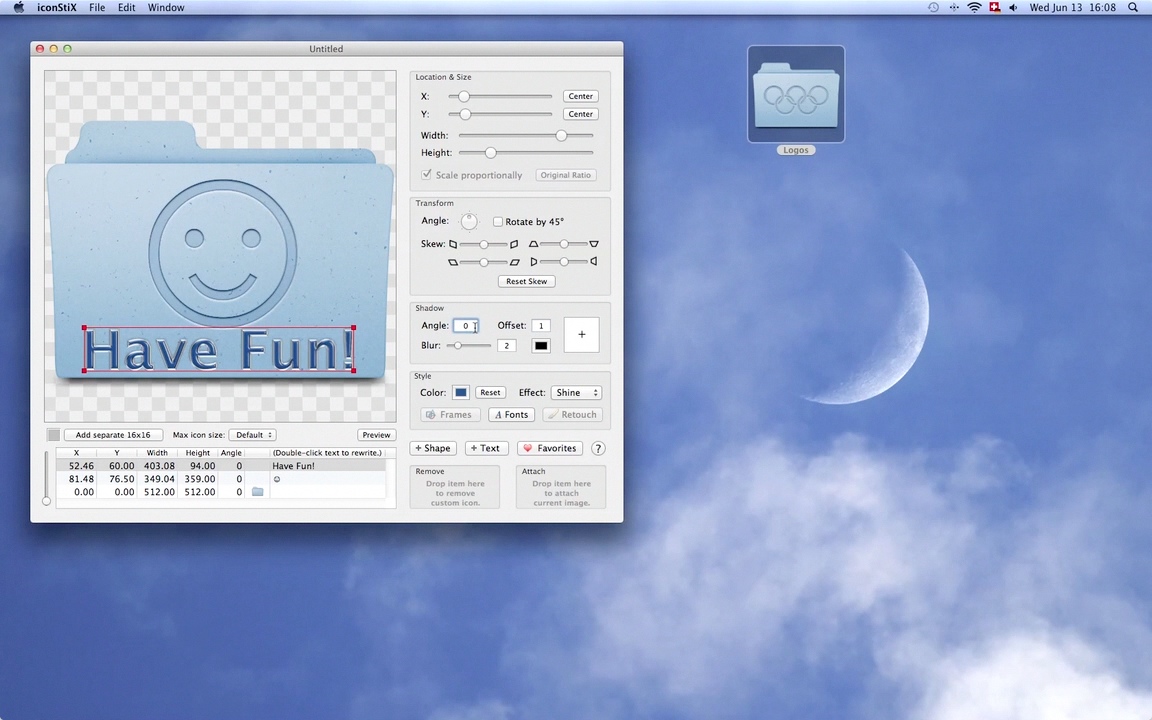
Attach and Remove Custom Icon
To attach the current image shown in the preview as a custom icon, drop a desktop item (folder, file or volume) in the "Attach" box.
To remove a custom icon, drop a desktop item in the "Remove" box.
Alternatively, right-click or ctrl-click on a desktop item to open the contextual menu and select "Attach Custom Icon" and "Remove Custom Icon" respectively.
Export (Save as Image)
Select "Export As" under the "File" menu to save the current preview image in the icns, png or tiff format.
You can include a size (number between 16 and 512 or 1024 if quality allows) in the filename to save as png (e.g. image_128.png). Icns and tiff automatically contain multiple sizes.
Tip: on the navigation panel you can select an already existing document to copy its name to be modified.
Favorites
Click the "Show Favorites" button to open the favorites panel, where you can collect your favorite icon images.
• Drop a desktop item to the collection view to add a favorite image.
Tip: Bring the item close enough to an existing image to see it slide aside before dropping.
• Alternatively, you can copy image to the clipboard and then paste it to the collection view (⌘V).
Tip: Ctrl-click or right-click on a desktop item and select "Copy Icon" from the contextual menu.
• Double-click or drag a favorite image to a row of the object table to replace images.
Tip: Keep mouse down on a favorite to see it duplicate before start dragging.
• Drag & drop image within the collection view to reorder.
• Press the backward delete key (←) to remove the selected favorite image.
Editing:
• Select Object
Click an object in the preview or click a row of the object table.
The latter is required to select an object smaller than the currently selected one.
To select more than one, click while holding the shift-key.
• Duplicate
Select an object and select the menu item "Duplicate ⌘D".
• Remove
Select an object and press the backward delete key (←).
• Move
Drag the selected object in the preview, use the X and Y sliders, or use an arrow key.
Note: By multiple selection, using a slider results in applying the same value to all the objects. To move them relatively, use an arrow key or locate the mouse around the middle of the four corner knobs and drag.
• Resize
Drag a corner knob of the selected object, use the Width and Height sliders, or use an arrow key while pressing the shift-key.
Select the "Scale proportionally" option if you like to keep the image's current width-height ratio (Note: text objects are scaled proportionally).
Click "Original Ratio" to get back the image original ratio.
Note: By multiple selection, using a slider results in applying the same value to all the objects. To resize them relatively, drag a corner knob or use an arrow key.
• Transform
To rotate the selected object, use the circular slider.
Select "Rotate by 45°" option to stop only at o, 45, 90… degrees.
To skew, move one of the four sliders to the direction of an appropriate shape.
• Shadow
Drag the cross in the shadow view to add shadow to the selected object.
To remove, drag back to the center position or enter 0 to the offset text field.
• Add / Replace / Modify Image
Drag & drop a desktop item to the preview (or a table row of the relevant image object).
Or paste image from the clipboard (⌘V) (the preview image can be copied to the clipboard (⌘C)).
Click "Retouch" to erase or paint over the image partially.
• Add / Modify Shape
Click the "+ Shape" button.
Click "Frames" to open the option panel. There you can select a different form and modify stroke color, thickness and style.
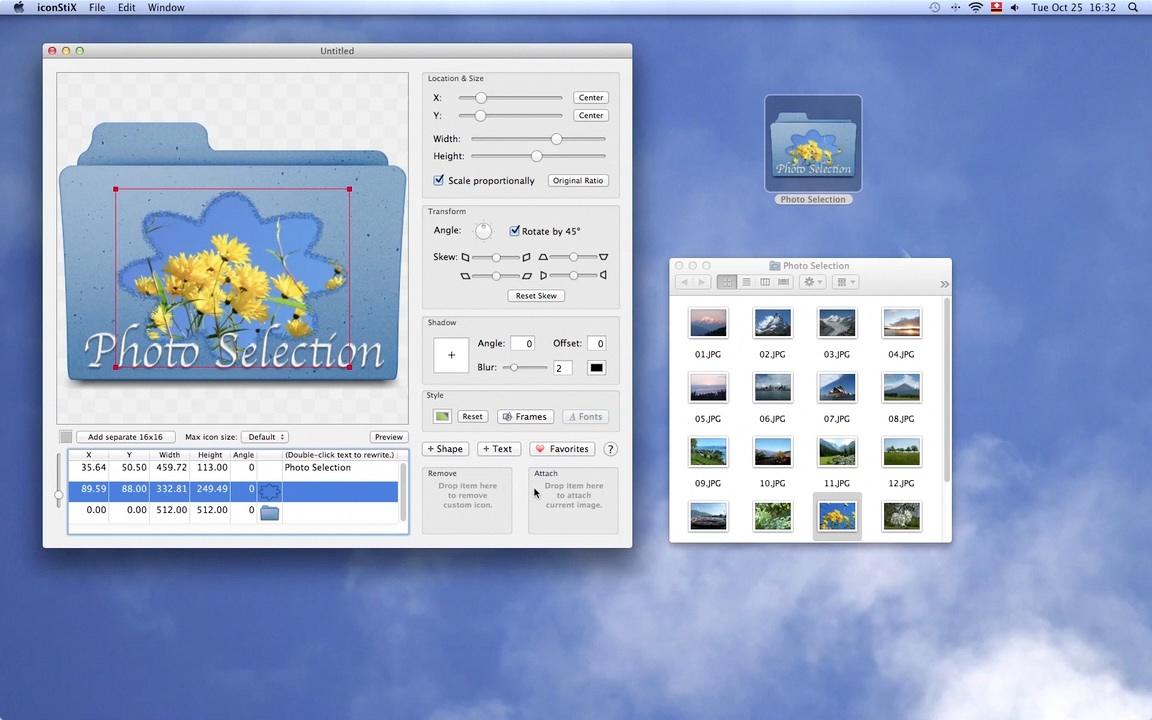
• Add / Modify Text
Click the "+ Text" button.
To edit contents, double-click a relevant row on the object table and overwrite the text.
Use alt+return to write multiple lines.
While editing, a contextual menu is available with right-click (or ctrl-click).
To change fonts, finish editing contents and click "Fonts".
• Color
To change color of the selected object as a whole, click the color well and select color on the color panel.
To use picture as texture, drop a file with image contents to the box on the color panel or to the color well directly (valid for image or shape objects).
Click "Reset" to use the default colors (image: transparent, text: dark blue).
• Effect

None Recess Shine Sketch
⸰ The "Ocean" color in "Crayons" on the color panel works well with "recess" on the default folder.
⸰ Turn white to transparent using "Retouch" to make plain images work mostly well with "recess".
⸰ "Sketch" works well to simplify images (not applicable for shapes). For text, font outline (available on the Font panel) may be more suitable than "sketch".
Further, you can change the following options by opening the Preferences (⌘,) :
∙ whether to terminate the program after the last document window is closed.
∙ whether to keep iconStiX open after it started for services.
✓ iconStiX offers 4 services if you ctrl-click or right-click an item in the Finder:
- Open with iconStiX: open iconStix using the image of the selected item.
- Copy Icon: copy the icon image of the selected item to the clipboard.
- Attach Custom Icon:
(a) add the preview image to the selected item if iconStiX is running;
(b) add image in the clipboard to the selected item if it is not running;
(c) if there is no image available, you can choose to open the iconStiX document lately used or cancel.
- Remove Custom Icon: remove a custom icon if the selected item has any.
✓ As usual with other Finder services, you can disable one or more services by opening "System Preferences" (select the menu item under the Finder/Services or click the button "Open Services Preferences Now" on the iconStiX preferences panel.
∙ whether to confirm when an item is dropped in the "Remove" box.
∙ whether to warn when an item which already has a custom icon is dropped in the "Attach" box.
∙ whether to replace, add, or ask what to do when an image is dragged to a document window's preview area or to the application icon while there is an image object already selected.
✓ If you select "replace without asking", make sure which object is selected before saving a document. When you start the program next time with any image source, the object selected last time becomes the replacement target.
Two more advanced features in the Preferences: you can change the key equivalent of "Export As" menu and the default location of save / export action.
Most of the above descriptions are available in the app by clicking  on a document window or on the Favorites & Preferences panel.
Also please refer to "How to select or deselect iconStiX services" if you require more details on services.
Hope you enjoy iconStiX
Disclaimer
The software iconStiX and its documentation are provided on an 'as is' basis without any other warranties or conditions, express or implied, including, but not limited to, warranties of quality, correctness, accuracy, and reliability, or otherwise. The entire risk as to the results and performance of the software is assumed by you (the user). Trollin (the author) shall have no liability to you for any indirect, incidental, special, or consequential damages whatsoever, including, but not limited to, loss of data or profits arising in any way out of the use of the software, even if the author has been advised of the possibility of such damages or they are foreseeable.
Copyright 2001-2012, T. Loosli (Switzerland), All rights reserved.
Contact: trollin@loos.li
Back to Trollin's Home